


RandoCartes — managing trails
The page for managing trails is displayed when you click on the Trails option in the main menu when the map is displayed.
It will look something like this:
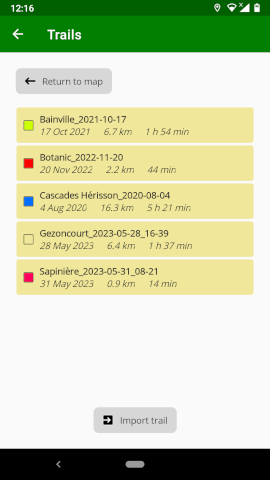
At the centre of the page is the list of trails that are available to the application. The first time you open the page it will be empty.
The little boxes next to the trail names indicate if a trail is currently displayed on the map. When the box is empty the trail is not displayed, when the box contains a colour that is the colour used to display the trail on the map.
For trails recorded or imported in the latest versions of the application you will see details of the trail under its name (recording date, distance and total time). For older trails these values are not displayed.
Import trail
At the bottom of the page is the button Import trail. You can use this to import a trail (GPX file) into the application.
When you press the Import trail button you will be presented with a list of files available for import. This list will differ according to your device, but you can navigate around your device until you find a GPX file to import. For example, if you have downloaded a GPX file from the web in a browser you can navigate to the downloaded files directory and select the file. The file name must end in .gpx to be accepted.
Once selected, the file will be imported into the application and you will see it in the list of trails.
Popup for a trail
To do other actions on a trail, you must display the trail popup. Just click on a trail and the popup for the trail will be displayed.
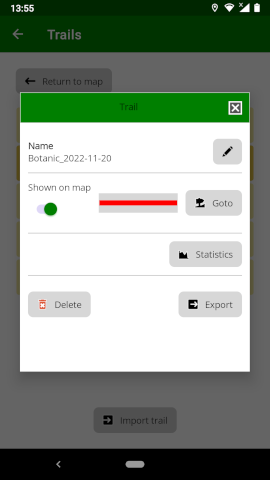
The following options are available in the popup:
Rename
Click on the button with a pencil icon to rename the trail. You will be presented with a dialogue box where you can modify the name.
Show on map
Slide the button to show the trail on the map (the square box will show the colour of the trail on the map) or to hide it (the box will be empty).
Goto
This button takes you back to the map with the trail displayed. The starting position of the trail will be in the centre of the map, but the zoom level of map will not be changed. This button is only active if the trail is shown on the map.
Statistics
This button displays a page showing various details of the trail — timing, distance, speed and altitudes.
Delete
This button allows you to remove the trail from the application. This action cannot be undone, but you will be asked to confirm your choice before deletion.
Export
This button allows you to save a trail as a GPX file outside of the application. You will be presented with a screen allowing you to select where to save the file and what name to give it. The file will then be available for other applications that can read GPX files.